Tag: Fun with PhotoDoc

Fun with PhotoDoc: Infrared (Edition 7)

Fun with PhotoDoc: Infrared (Edition 7)

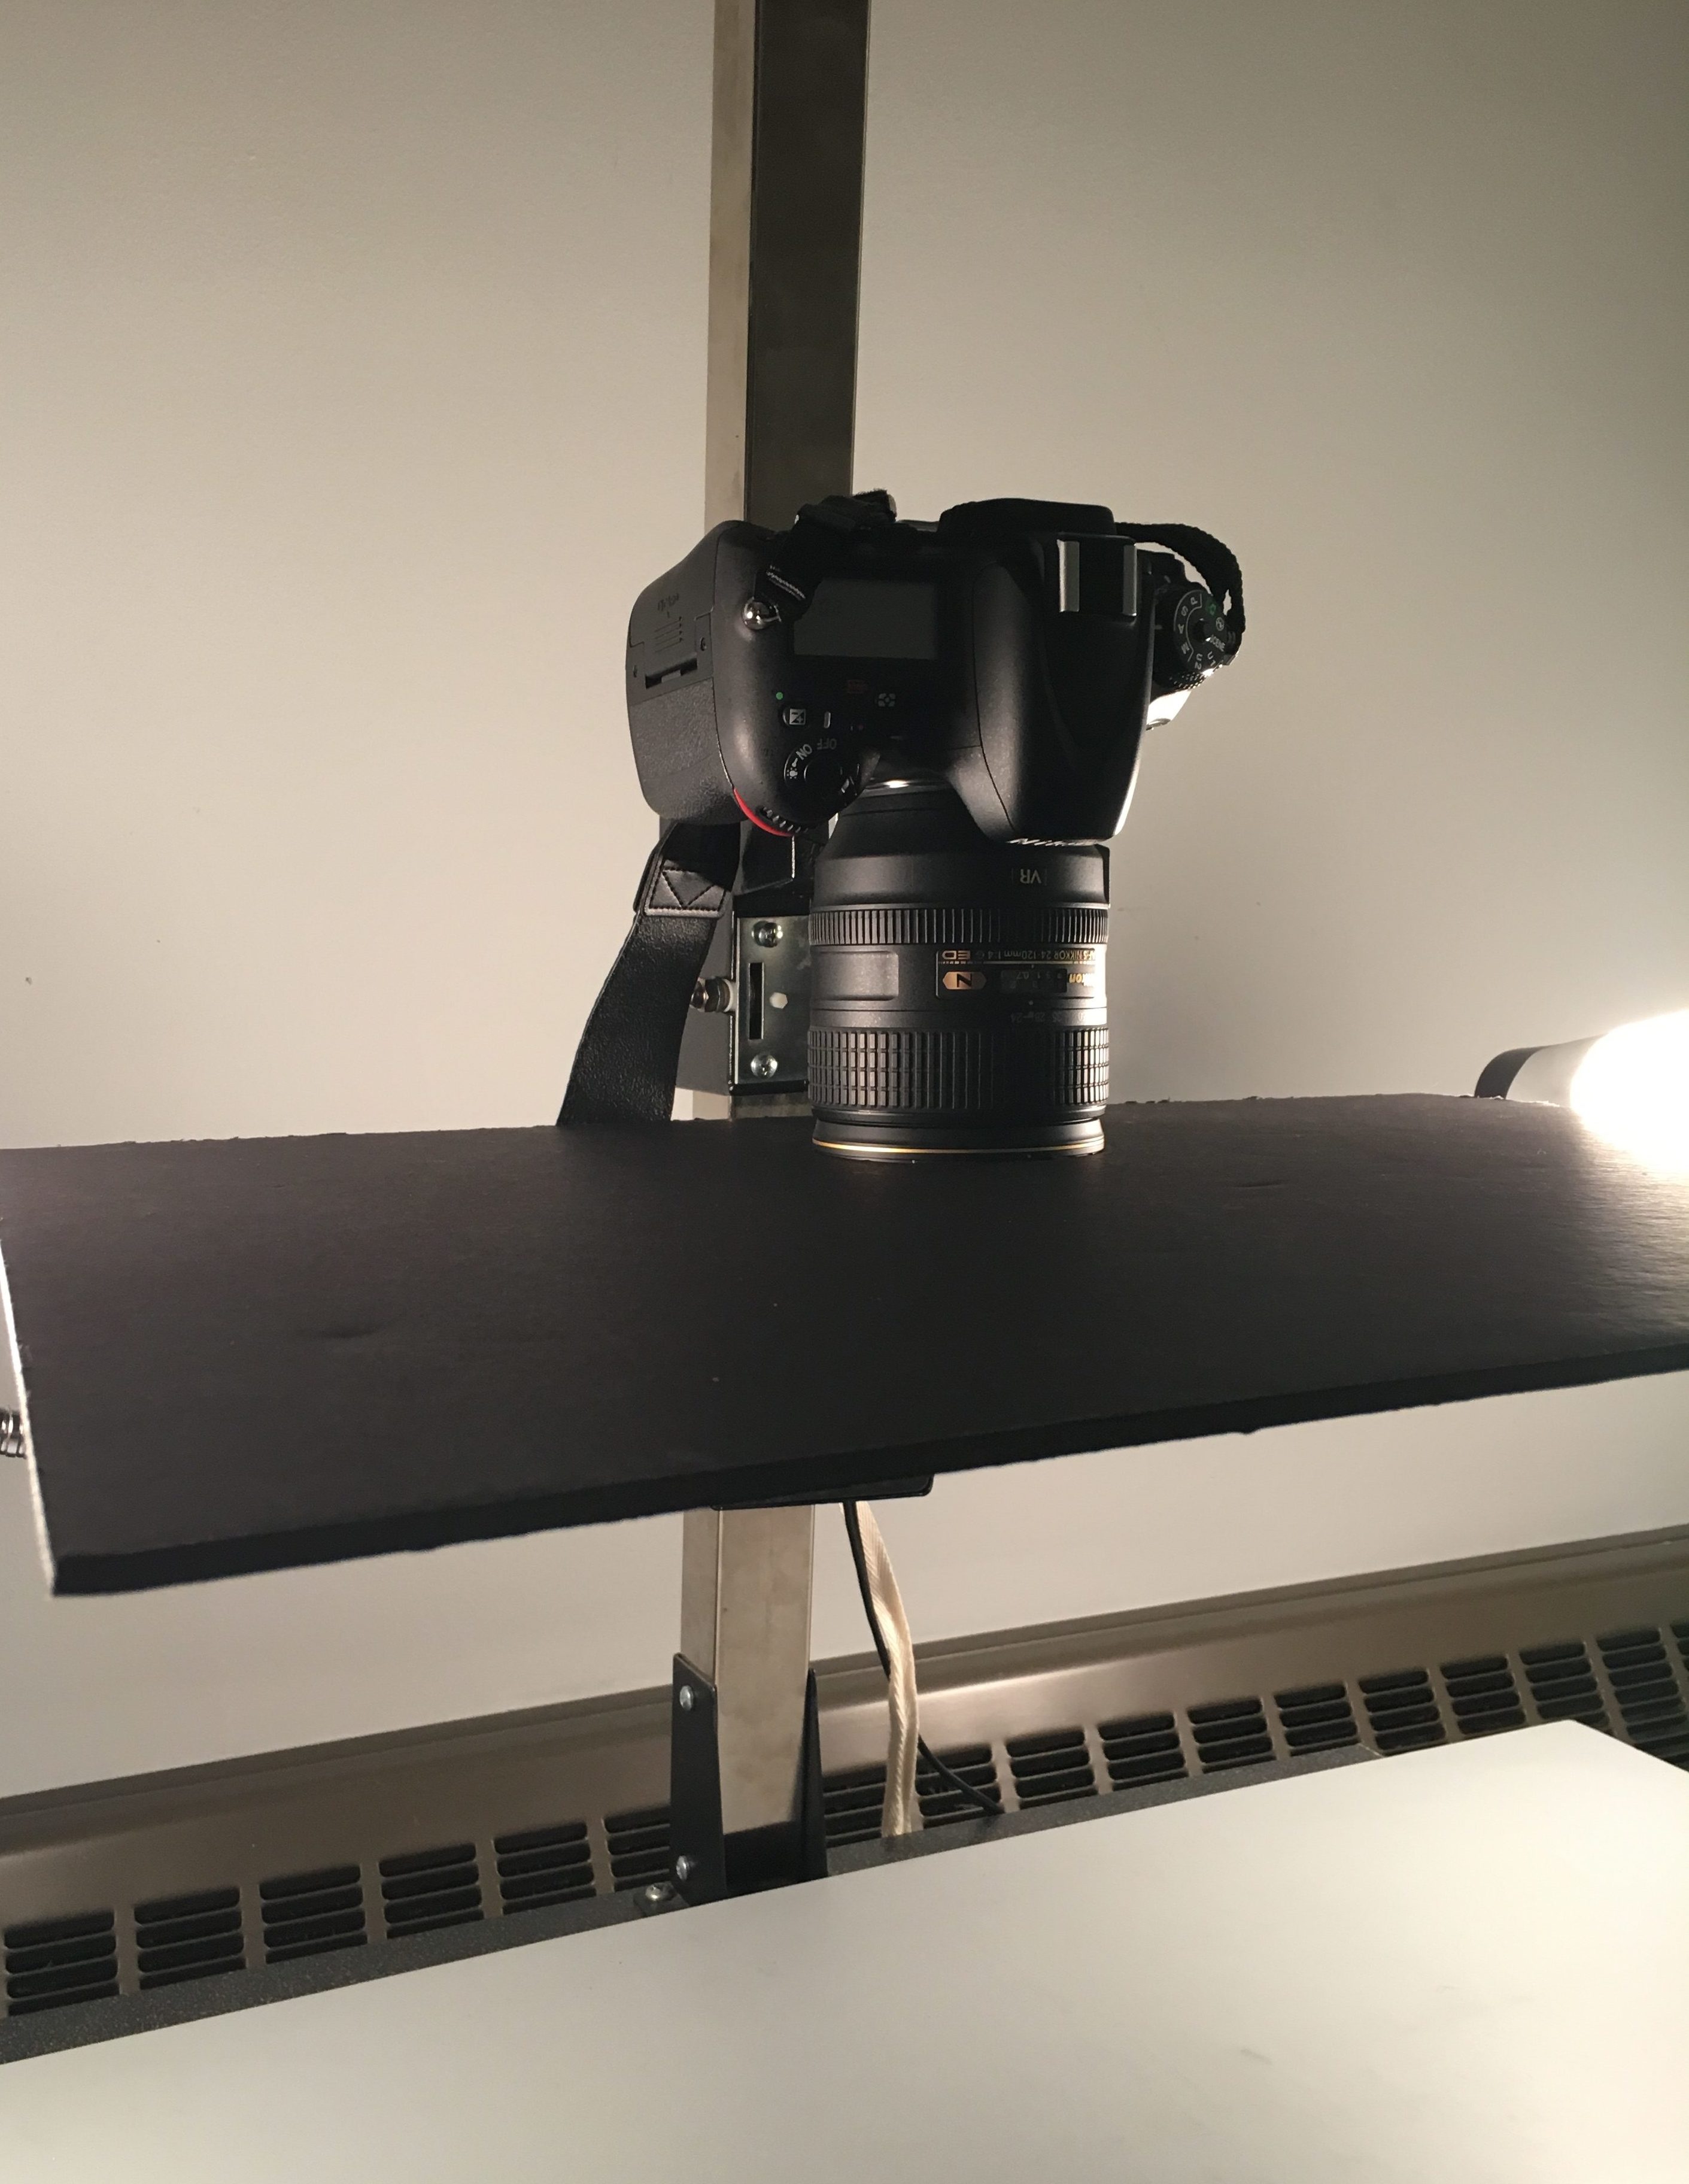
At the end of last year the lab purchased a modified UV-Vis-IR Nikon through MaxMax so that we can start to play around with infrared photography.  Infrared photography (IR) is commonly used in fine art conservation as an examination tool.  Reflected IR can be helpful when trying to identify pigments, inks, coatings, etc. and transmitted IR can helpful for viewing watermarks, underdrawings, and linings. We’ve only just started dabbling with IR photography, but I wanted to share some photos from my most recent session with reflected IR.
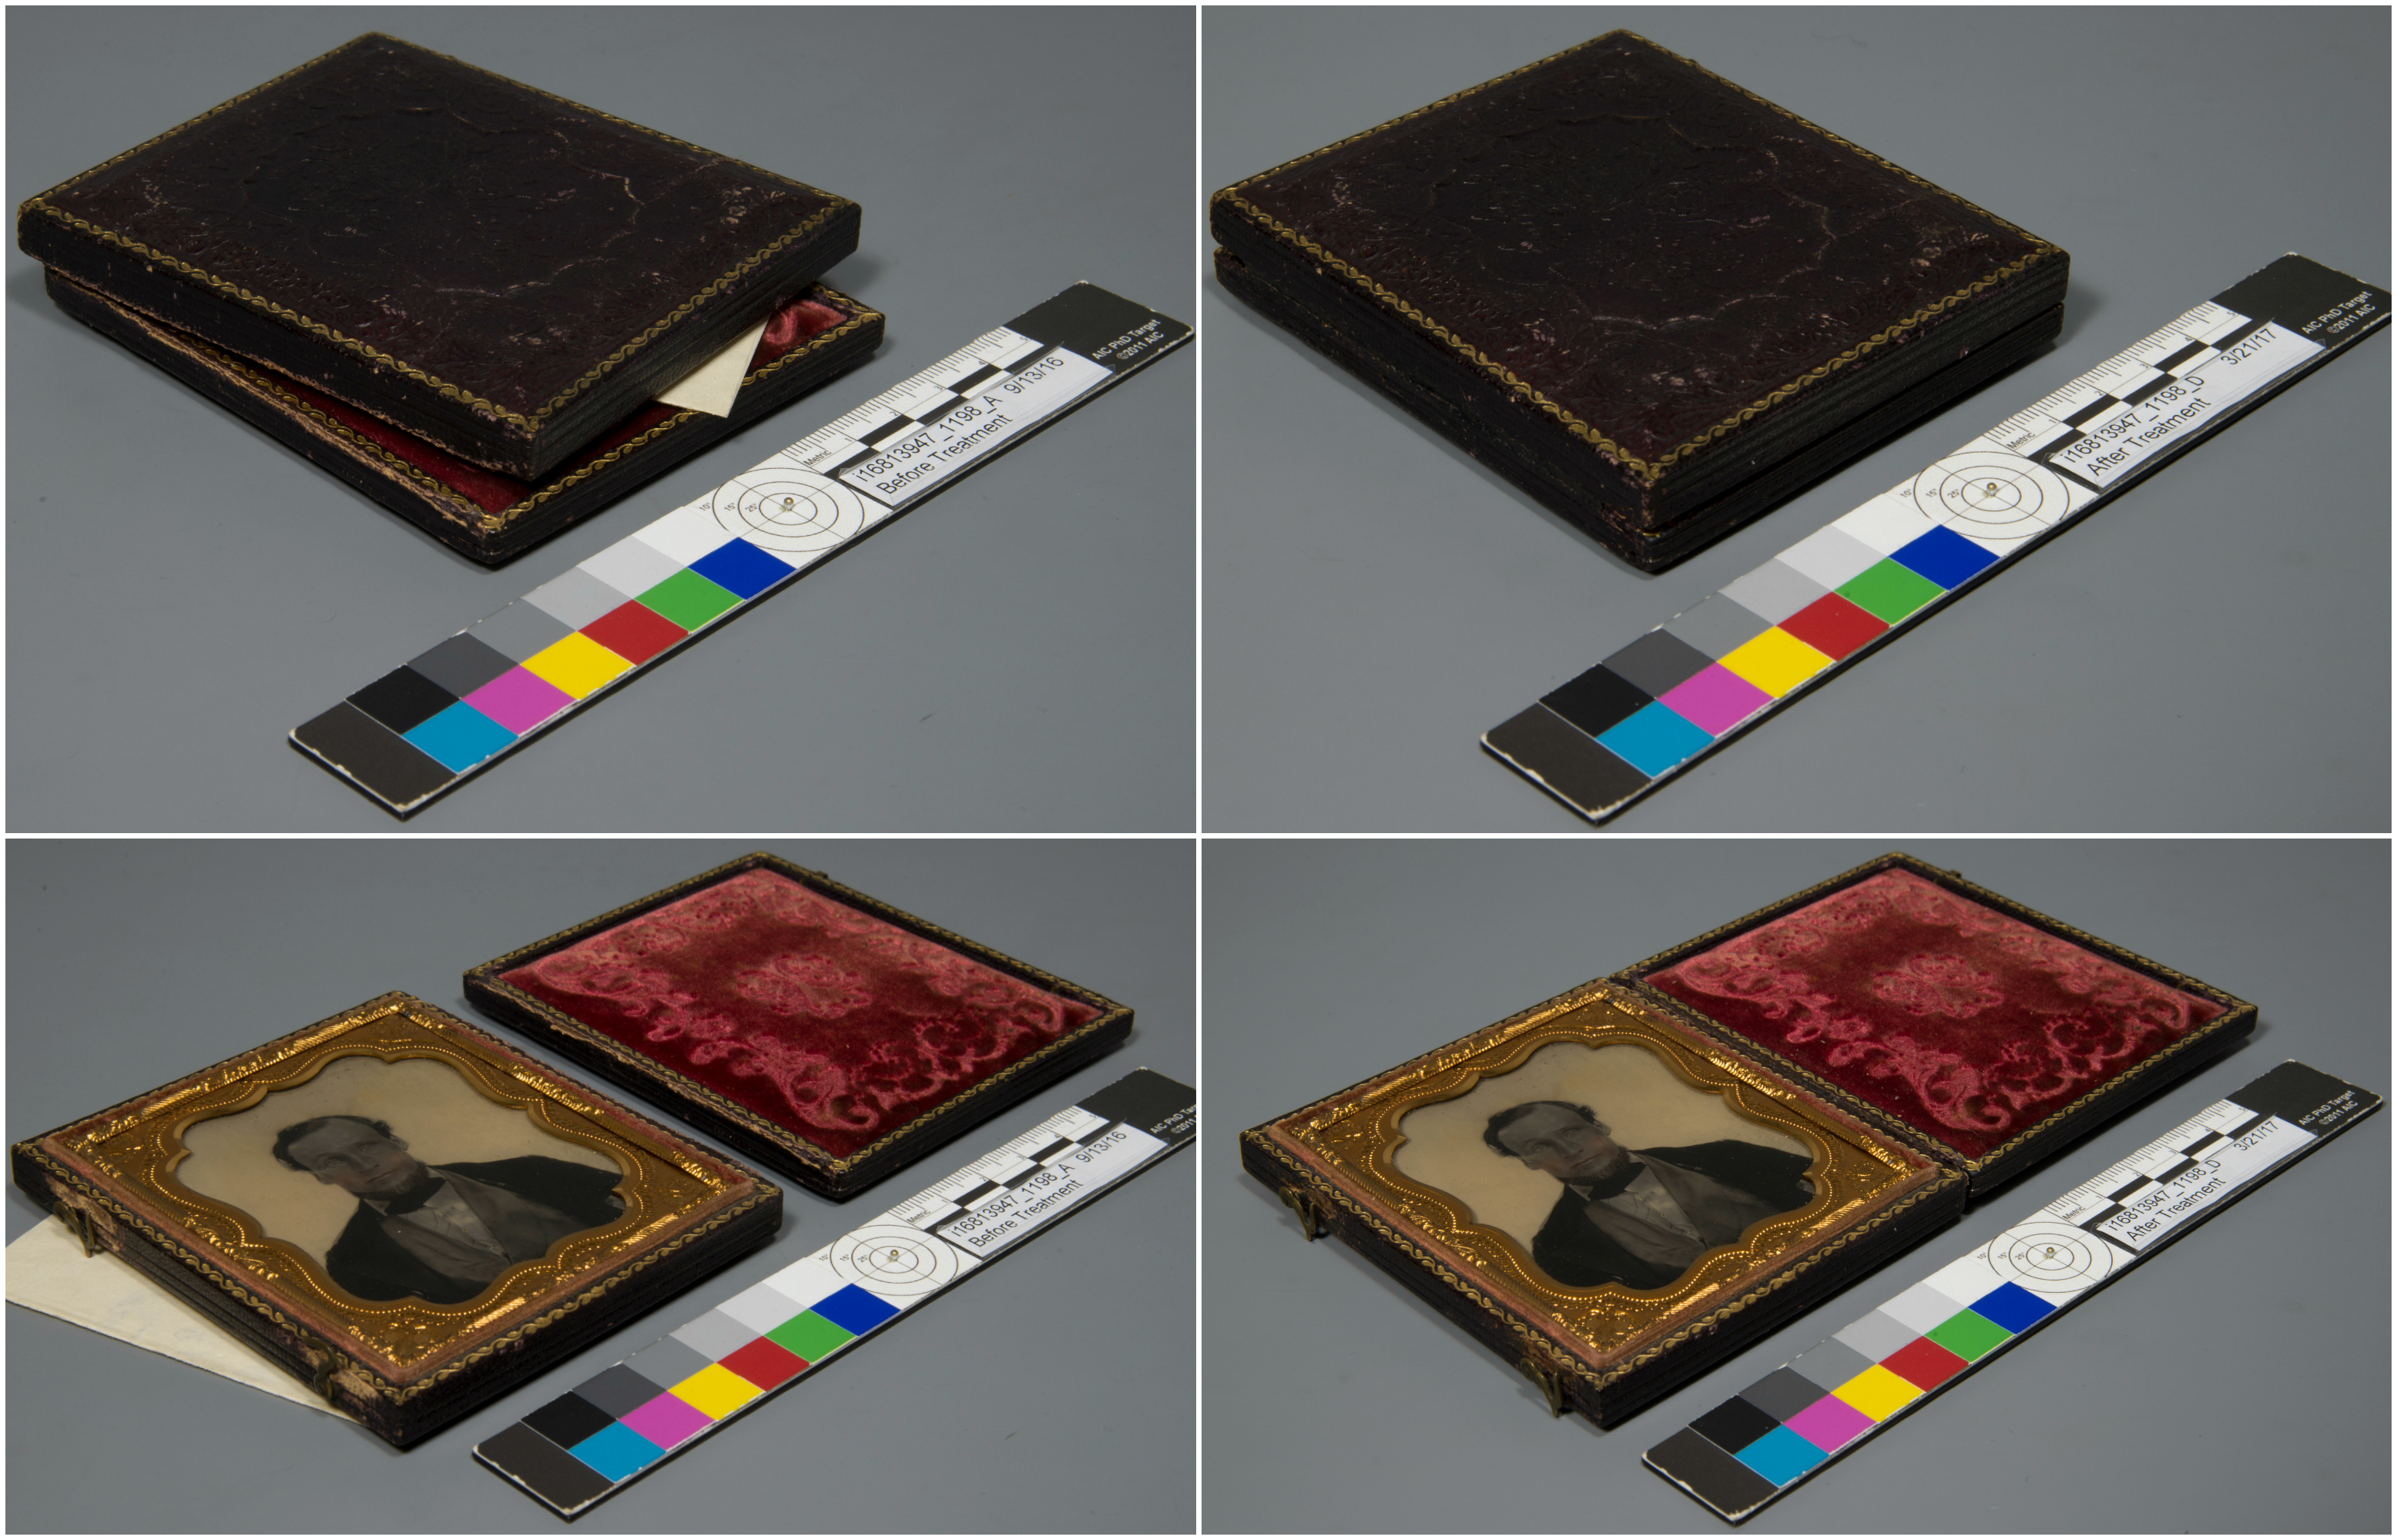
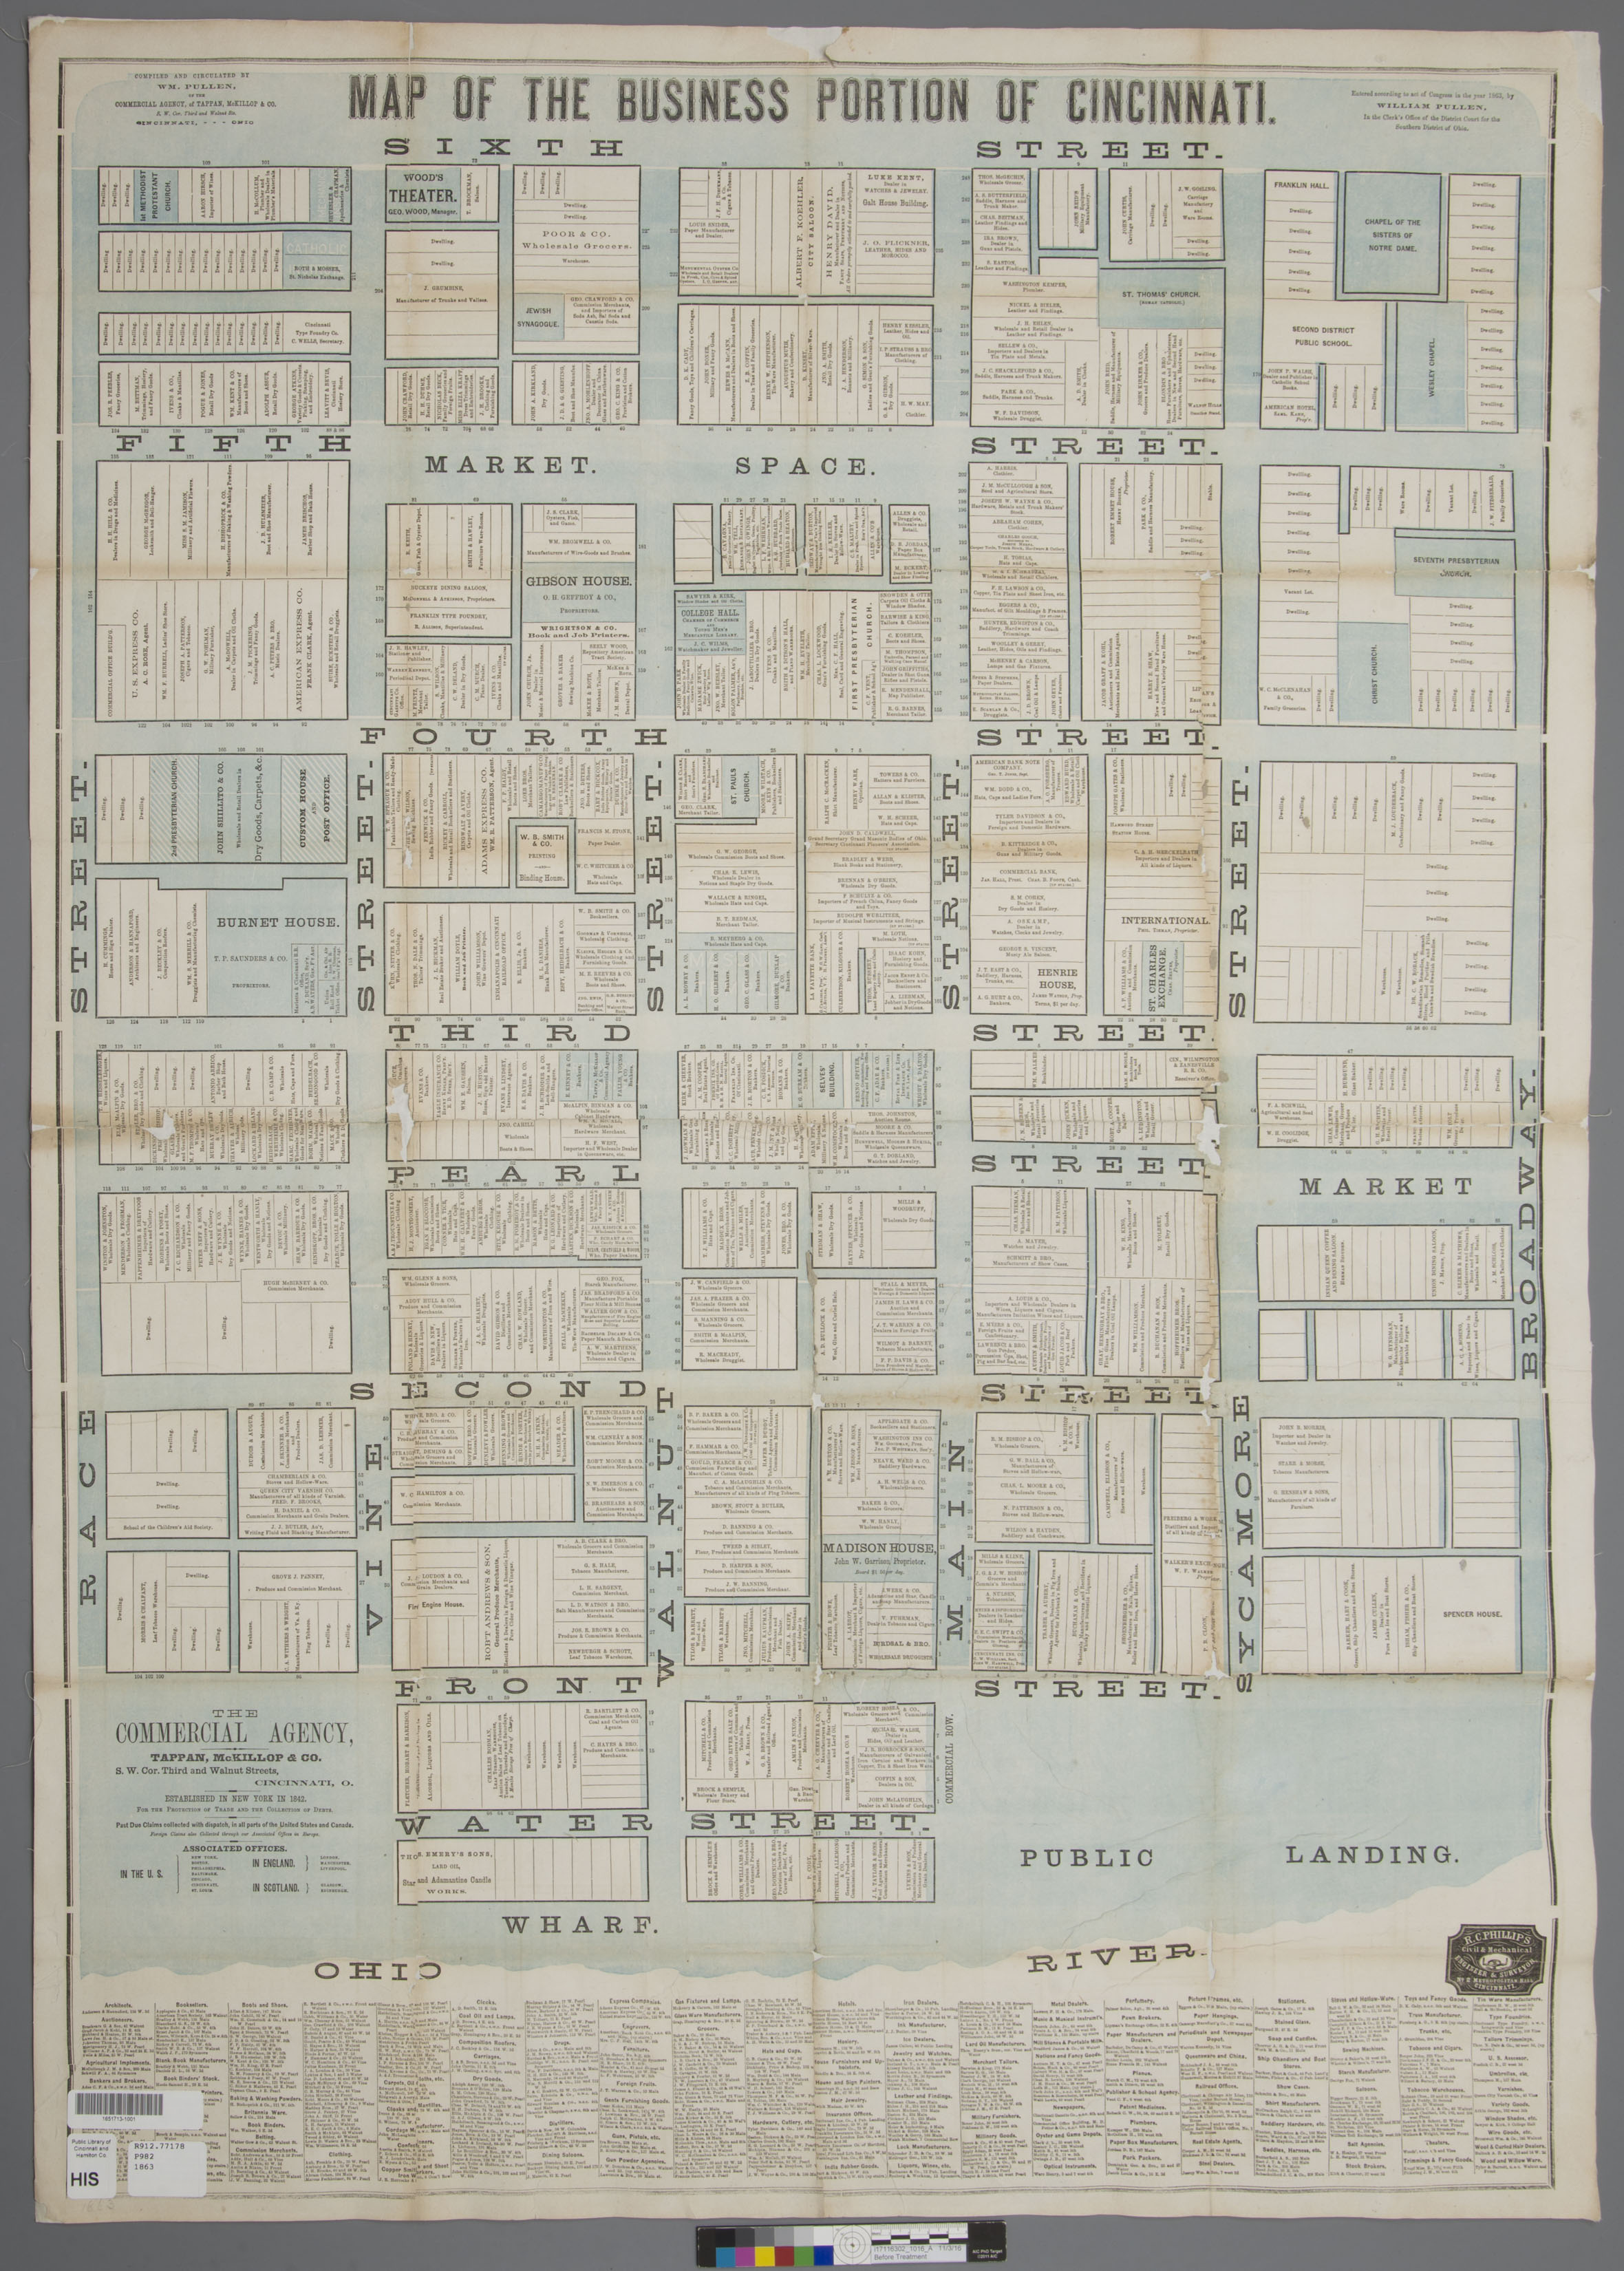
This is a full leather photo album from the Public Library of Cincinnati & Hamilton County’s collection.  This early 1900s photo album contains hand-colored silver gelatin photographs taken by A. Nielen.   The photographs appear to depict his travels through the US and Canada, and various landmarks and neighborhoods of Cincinnati are represented.

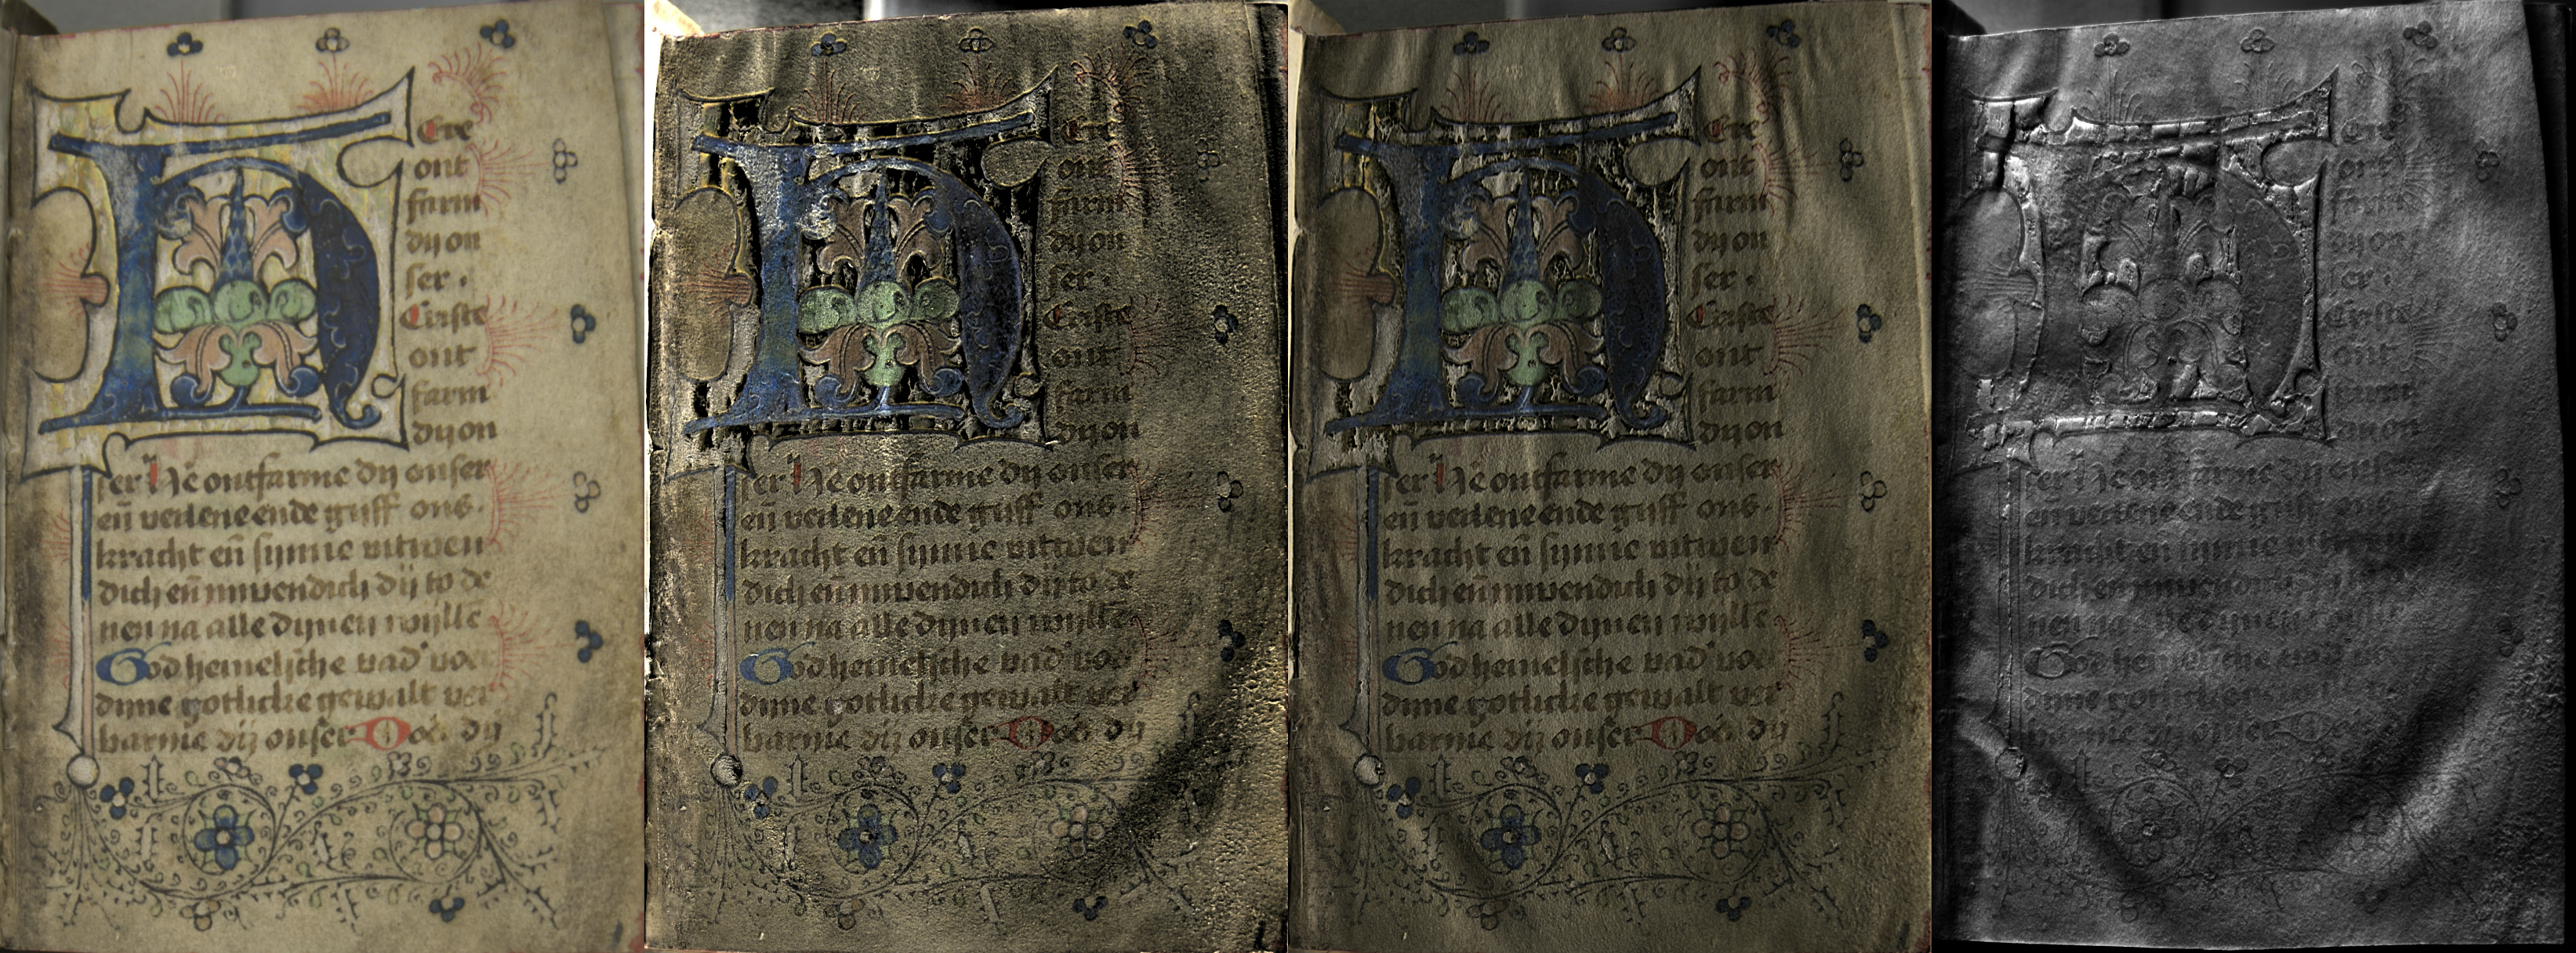
This seemed like a good object for reflected IR because of the hand-coloring on the photographs and the white ink inscription below each photograph.  I began by taking a representative visible light image (first image below) using our modified UV-Vis-IR camera, incandescent lighting, and the X-Nite CC1 filter on our 50mm lens.  Then, being careful not to move the position of the camera or the object, I switched to the X-Nite 830 filter (830nm) and converted that image to grayscale in Photoshop (second image below).  Then I took my visible light image and my reflected IR image into Photoshop to create the false-color image (third image below).  The digital false-color image is a combined representation of the visible and infrared images, and it’s actually quite simple to make.  You basically copy and paste the various channels for the VIS and IR image as follows, green to blue, red to green, and IR to red.  The false-color image allows you to better differentiate and characterize the various materials (pigments, inks, etc.) and potentially even identify them if you have sufficient known samples to use as references.

Like I said, we’ve only just started using IR and we’ve got a long way to go, but I’m looking forward to experimenting and learning more about it as time goes on.
Jessica Ebert (UCL) – Conservation Technician

Fun with PhotoDoc – RTI Viewer Video (Edition 6)

Fun with PhotoDoc – RTI Viewer Video (Edition 6)

In my last “Fun with PhotoDoc” post I discussed the my recent RTI training with Cultural Heritage Imaging at Yale University.  If you missed that post you can check it out here.  In that post I discussed our first RTI capture session on a book entitled, Aller Bücher und Schrifften des thewren, seligen Mans Gottes Doct. Mart. Lutheri …, which is part UC’s Archives & Rare Books Library’s collection and is the eighth volume in an eight volume set.   The binding is most likely age-hardened alum-tawed leather (though possibly vellum) on wooden boards with embossed paneled decoration that is barely visible under normal illumination.  In that first RTI blog post I shared some snapshots of the various RTI modes you can explore within the RTI Viewer software, but I knew that I ultimately wanted to create a video capture of the RTI Viewer in action.  I was finally able to do that using a free software called TinyTake.

This video can also be viewed through UCL Media Space:  https://stream.libraries.uc.edu/media/AllerBucherUndSchrifften_i17632730_VideoCaptureRTI/1_s13c9opc
In this video we explore the following modes built within the RTI Viewer as the light position is moved around the object:

  • Default Mode (HSH)
  • Specular Enhancement Mode with color removed (HSH) – notice the “1571” inscription that becomes more apparent.  This volume was printed in 1568, and we believe that 1571 was when the publication was bound.
  • Normals Visualization Mode (HSH) – allows the human eye to better determine is convex and concave on the surface of the cover.
  • Diffuse Gain Mode (PTM) – This mode is ideal for visualizing surface abrasions and losses. Take notice of the “ID” inscription that becomes more visible, and when we switch back to the default mode you can see that this “ID” inscription is virtually invisible to the naked eye.

I have to say, Catarina and I really enjoyed the capture process for this binding, but when we found that “ID” and then looked at the physical binding and could barely see anything…we were kind of giddy!  I’m hoping to create more RTI Viewer video captures like this as we carry out more RTI capture sessions for collection materials.  When I do, I will make sure to share them here.
Jessica Ebert (UCL) – Conservation Technician

Fun with PhotoDoc – RTI (Edition 5)

Fun with PhotoDoc – RTI (Edition 5)

At the beginning of April I was lucky enough to attend a RTI (Reflectance Transformation Imaging) workshop offered by Cultural Heritage Imaging (CHI) at Yale University.  CHI is a non-profit organization  that shares and teaches RTI and Photogrammetry technology with cultural heritage institutions around the world.  The class I attended was a 4-day NEH grant sponsored course taught by three RTI experts from CHI, and it was amazing!

This is a composite image of all the highlight points from one RTI section. The software uses these highlight points to map the surface shape and color of your object.

So, what is RTI?  CHI describes it on their website as “a computational photographic method that captures a subject’s surface shape and color and enables the interactive re-lighting of the subject from any direction”.  For highlight RTI, which is the least expensive and most accessible method for most institutions and what I was taught in the class, you basically take a series of 36 to 48 images of an object where everything is constant (settings and position of objects, camera and spheres) except for the light position.  With a reflective black sphere (or 2) set up next to your object, you move you light source around the object at varying angles.  Then, you take that set of images and plug them into the free RTI software provided by CHI and the algorithm detects the sphere(s) and the highlight points (from your light) captured on the sphere(s) and voila!…you have an fun and interactive way to look at your object’s surface texture.
Before I attended this fantastic training opportunity, our conservator and I knew right away what the subject of our first capture would be when I returned…a 16th century German Reformation text by Martin Luther with a highly decorated cover that is practically invisible under normal illumination.

Here’s a time lapse video of our first (and second) capture in the Lab…
That day (Tuesday) were were able to capture the upper and lower covers of the Reformation text (from ARB), the original silk cover from a 17th century Chinese manuscript (from Hebrew Union College) and an illuminated page from a German vellum prayer book (from PLCH).  And here our some snapshots of our results from two of those captures (click on the thumbnails for a larger view of the image)…

This possibly 13th century German Prayer Book has a full stiff vellum binding and an illuminated first page.  The varying modes highlight condition issues like worn/abraded parchment and flaking gold illumination, as well as the overall surface texture of the illumination.

I hope you’ve enjoyed getting a little sneak peek into RTI.  I will be demoing and discussing in further depth this afternoon from 1:30 to 3pm at the Lab’s annual Preservation Week Open House.  I also hope to do more RTI captures/processes in the future and share them here.
Jessica Ebert (UCL) – Conservation Technician

Fun with PhotoDoc – Edition 4

Fun with PhotoDoc – Edition 4

The amazing enclosure made by our very own conservation technician, Chris Voynovich, for volume 1 of the W.S. Porter Collection.

We very recently returned a two volume collection of photographs taken by William S. Porter, known as the W.S. Porter Collection, to the Public Library.  William S. Porter is known in Cincinnati as one of the two photographers responsible for the 1848 Cincinnati Panorama (you can read more about and even explore this amazing daguerreotype panorama here). Volume one of the collection consists of 7 cased photographs (including daguerreotypes, ambrotypes, and tintypes) and 1 non-cased tintype, all reportedly taken by W.S. Porter, while volume 2 consists of one framed daguerreotype of W.S. Porter and a preservation print of that photograph.  When these photographs arrived in the Lab for treatment, many of the cases were damaged (especially along the spine – some broken completely, one previously “repaired” with tape, etc.), the framed photograph needed re-packaging, and the collection needed two custom enclosures (vol. 1 & 2) to safely store all the photographs.
(Left) Before “bench” photos of one of the cased photographs labeled “John Wesley Lever”, (Right) After photos of the mended case.

Now, as anyone who does photographic documentation will tell you, taking treatment documentation photos of photographs is a pain, especially on the copy stand (i.e. from above) and especially when you were trained in-house in a book and paper lab.  Glass objects just aren’t as common around these parts.  During PhotoDoc glass just acts as a mirror, reflecting all your light and even your camera lens and obstructing the actual photograph you are trying to capture.  But we knew that we wanted some good quality photos of the photographs to print as surrogates and to also use in the enclosures.  Black foam core and an Olfa rotary cutter to the rescue!  Using these two supplies I created a non-reflective black surface to place around the camera lens to help reduce reflections and absorb light.
In order to mount this black foam core on the camera lens I measured the diameter of our lens and the distance from the edge of the lens to the neck of the copy stand when the camera was in place.

The foam core allows enough flexibility for the deflector to just slide past the UV filter and snap into place securely.


With the black non-reflective board in place, I was able, with guidance from our conservator, to get some pretty good shots of the photographs to be used as surrogates.  The photos were also printed out and attached to the back of individual tuxedo boxes for each cased photograph.  Instructions to “store face down” were placed on the front of each tuxedo box to assist patrons in proper storage.  (The glass on all of these photographs is degraded and if stored face up the glass can actually weep onto the photograph causing significant damage, therefore cased daguerreotypes/ambrotypes/tintypes are generally stored up-side-down to prevent further damage to the actual photograph).  All of the tuxedo boxes for volume 1 were housed within a two-tiered clamshell box with two removable trays made by our resident “Box Master”, Chris Voynovich.  It should be noted that it’s a miracle this enclosure made it out of the lab and back to the Public Library, because several staff members were so enamored with it and thought it would make the best jewelry box!  I mean, it kind of would, wouldn’t it?
Here are the images I was able to obtain using my homemade non-reflective board:

Jessica Ebert (UCL) – Conservation Technician

Fun with VideoDoc: Lining a Oversized Map (Edition 3)

Fun with VideoDoc: Lining a Oversized Map (Edition 3)

Before treatment photo, map with cloth lining.

A couple months ago the lab received an oversized map from the Public Library’s collection.  The map is from 1863 and depicts the businesses of downtown Cincinnati at the time.  The Public Library would like to digitize the map, however when it arrived in the lab it had a variety of creases, stains and losses.  It was also previously lined with cloth.  Conservator, Ashleigh, and Sr. Conservation Tech, Catarina, began the work of removing the map from the prior cloth lining, washing the detached sections of the map to assist in removing the prior cloth lining adhesive, and locally humidifying and flattening the creases and distortions in the paper (caused when the map was previously lined).
Next up, lining the map with kozo fiber tissue and a mixture of wheat starch paste and methyl cellulose.  For this, Ashleigh and Catarina created a make-shift light table, since the Lab’s was not large enough and began piecing the sections of the map back together.  I couldn’t not document this climactic part of the treatment, so I went a little crazy, threw my go-to documentation equipment out the window (i.e. our Nikon DSLR), grabbed my iPhone and made a little video to illustrate the process.  I hope you enjoy it!

*Please note, portions of this video have been sped up to shorten the length of the video…Ashleigh and Catarina work quickly, but not THAT quickly!
Jessica Ebert (UCL) – Conservation Technician

Fun with PhotoDoc – Edition 2

Fun with PhotoDoc – Edition 2

I’m back for another edition of “Fun with PhotoDoc”.  If you missed the first edition you can check it out here.  Originally I had planned for that to be a one-off post, but then I thought it might be fun to make this into more of a series, sharing interesting facets of photographic documentation (aka PhotoDoc) as they come up.  Really, it just gives me an excuse to share all the things about PhotoDoc that I think are just plain cool and to make gifs out of treatment documentation photos, which is so much fun!
This time around I wanted to share some interesting before treatment photos of two War Bond posters from the Public Library of Cincinnati & Hamilton County’s collection.  For both of these I photographed the posters using normal illumination and then used raking illumination to highlight tears, cockling and bends/breaks in the paper.

With this War Bond poster the raking illumination really shows off that large tear that extends from the center to the bottom of the poster. And while the normal illumination allows for better visibility of the water damage in the bottom left hand corner, raking light better highlights the resulting cockling and distortion of the paper in that area.
With this War Bond poster the raking illumination really shows off that large tear that extends from the center to the bottom of the poster. Under normal illumination this substantial tear gets lost in the pattern of the female subject’s dress. Also, while the normal illumination allows for better visibility of the water damage in the bottom left hand corner, raking light better highlights the resulting cockling and distortion of the paper in that area.

For this poster, raking light really highlights all the undulations and cockling that have been caused by the poster being partially adhered to a piece of board. You can also more clearly see the fairly large tear located under the word "Hun".
For this poster, raking light really highlights all the undulations and cockling that have been caused by the poster being partially adhered to a piece of board. You can also more clearly see the fairly large tear located under the word “Hun” under raking illumination versus under normal illumination.

Jessica Ebert (UCL) – Conservation Technician

Fun with PhotoDoc – Edition 1

Fun with PhotoDoc – Edition 1

Since I am the conservation technician who carries out most of the photographic documentation in the lab I think that pretty much all PhotoDoc is fun.  With all the different tools in the toolbox it really doesn’t get much better than when you get to bust out the ultraviolet radiation to reveal something that is otherwise not so obvious under normal illumination (like a stain, handwriting, etc.).  And then when you can transform those normal and UV before photos into a gif…well, that just makes for a fun Friday, if you ask me!

classphoto_uv_gif
This photograph is part of the Henry R. Winkler Center for the History of the Health Professions collection and arrived in the lab with the original glass broken and partially attached to the photo. It is obvious under normal illumination that the photograph endured some kind of spill or water damage, but under UV florescence you can better make out the path that the water or perhaps beverage created and even note splotches of possible mold damage (which flourese purple).  Now that’s it’s photographed I’ll turn it over to Ashleigh, our conservator, to determine what’s happened to this poor thing and the best course of action when it comes to treatment and storage.

Jessica Ebert (UCL) – Conservation Technician